Bella10 Philosophy

BELLA10 PHILOSOPHY

At Bella10, we are all about the natural nails! We know it takes care and time to create a beautiful set of natural nails and smooth, healthy skin and cuticles enhance the overall appearance. Bella10 supports natural nail care through skilled nail technicians, personal nail care and great natural nail care products. We always recommend regular manicures, whither done by a licensed professional or at home, by yourself or with friends. Bella10 does recommend being a knowledgeable consumer when choosing a nail salon, nail technician, nail care product or tool. Bella10 is here to help.

Pages

Showing posts with label Gel Nail Removal. Show all posts

Monday, September 23, 2013

The Secret to Artificial Nail Recovery

Mary first came in to the salon on the last day in January 2013.  She had delayed in coming in to see me after she and I had a brief phone consultation right after Christmas of 2012.  She told me that she had a New Year's resolution goal to have her own natural nails again but she really didn't think it was possible.  She had been wearing acrylic nails for approximately 30 years.  I told her that damage happens from the first time you apply artificial nails due to filing across the top of the nail and persists with fills and lifting. I told her that if she was interested in getting her own natural nails back, I could help her achieve that goal.  I have seen all kinds of damage to the natural nail and, at the time, I was unaware of how chronically acute her nail condition was.  Mary has been involved in the beauty industry and she had delayed in seeing me because she was embarrassed by her nails. 

Day 1 - OMG!  

She had told me her nails were bad, and when I saw them, all I could think of was how long this process would take.  Mary had some of the worst damage I had seen in a long time and that damage was extensive!  This was no easy fix and the biggest thing she needed from me was encouragement! 
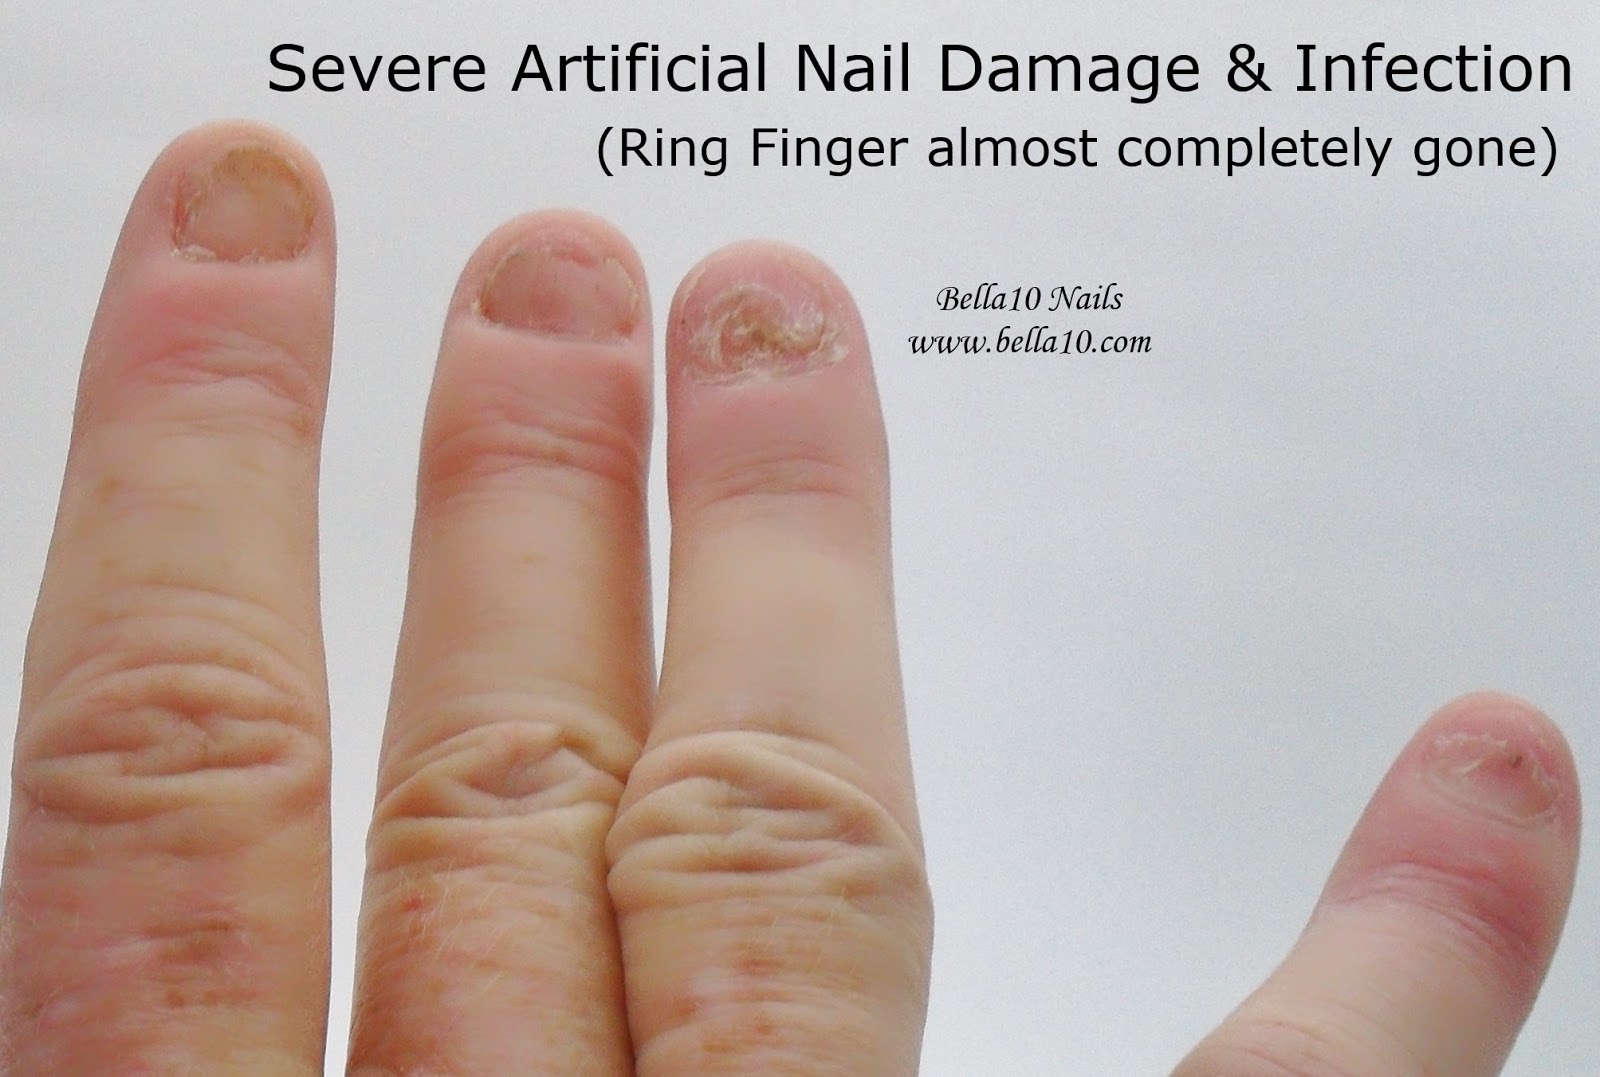
The ring finger on her right hand was practically gone!

I was truly concerned and told her that the most important thing she could do is to start treating her nails with Tea Tree Oil (Melaleuca Essential Oil) 2-3 times per day and use cuticle oil every day.  I examined her ring finger and noticed that it hadn't gone down into the nail matrix yet, but it was daringly close!  Any closer and a physician would definitely be required!
There was still Hope!
Her left hand was not as bad as her right but it still needed a lot of time to heal.
Mary's nail prognosis was hopeful but it would take time and patience for her to get her nails back, and it was still questionable on if there would be any permanent damage to the nail matrix.

Mary's nails were thin and ragged so I gently filed the edges that had a little "white tip" with a 400 grit file to smooth the edges.  I cleaned up her cuticle area and put some clear polish on what there was of her natural nails.  Her home regimen included Tea Tree Oil (Melaleuca Essential Oil) 2-3 times per day, Cuticle Oil 1-2 times per day and a coat of clear polish every other day.  She needed to come in about every 2 to 3 weeks for a manicure.  I also told her that if she noticed any of her nails getting worse that what she saw currently or any infection getting worse, she needed to contact her physician. (Thankfully, that was unnecessary!)

Day 100 - Marked improvement!!!

I am amazed at the improvement, just with Tea Tree Oil.  But now I notice another problem, and it is one that is common for this level of damage.  Mary has a tendency to pick at her fingers, especially if she sees an imperfection.  Mary's left hand is looking much better but her right is still suffering.  Her ring finger (which was her worst case scenario on Day 1) looks better than her middle finger. Her middle finger has been the brunt of obsessive behavior because it is one of the prominent nails of her dominant hand. Now it's time for focus on maintenance instead of cures.
I give Mary a gentle manicure and only smooth out the very tips of her nails so there is nothing to snag or catch her attention in that manner.  I start her on a regimen of nail polish to be applied every other day after today's manicure.  I still want her to treat her nails daily with Tea Tree Oil and cuticle oil, but now I want her to start with a clear polish on her nails to help her maintain some strength and I need to minimize any peeling or chipping that may draw her attention to her deficient nail.
As I mentioned earlier, this is "no easy fix", this takes time and patience.  In place of a regular top coat, I use a product I recently found at my local Sally Beauty Supply called Gelish Mini VitaGel Recovery
by Gelish brand Gel Polish.  This product does need a UV or LED light to cure it but I found that it works fabulously for damaged or weak nails.  I love the two different formulas, one is called Recovery and one is called Strength.  If you don't have a UV or LED light, you can use Jessica Cosmetics Restoration, for post acrylic damage, or you can try Starting Over, a Salon Sciences brand that you can purchase through your local Sally Beauty Supply.
When the nails look like they do at this stage, they still need a lot of care.  The nails need to remain covered with a strengthener made for recovering nails and remain covered for the duration of the regrowth.

I don't hear from Mary for a while again.  Finally, when I do hear from her, it is to take pictures of her nails again and the growth she has achieved!  I can hear the excitement in Mary's voice.

Day 200 - All I can say is WOW!

Mary is in awe of how strong her nails are and how great they look.  She never thought her nails could be this strong!

Mary's nails are now on the road to permanent recovery!  There is still some issues that need to be addressed, but her nails are strong, resilient and they look so-o-o much better than they did when she first came in.  Mary's nails can only get better from here and it is always gratifying to see the transformation from disaster to healthy nails!

Check out the right hand!!!  Amazing!  Isn't it?!

According to Mary, her nails have never looked this great or have they been this strong!  She says her nails were always weak and flimsy, now they are strong, yet flexible and withstand breakage even if she is a little hard on them.
It is amazing to my clients when they finally achieve healthy natural nail growth and they can't believe how strong and healthy their nails really are!

And the most important secret to artificial nail recovery is?... 

PATIENCE!

After patience, the three most important topical items for artificial nail recovery are;
  1. Tea Tree Oil (Melaleuca Essential Oil - great for damage recovery because it prevents and helps to heal bacterial and some fungal infections.
  2. Post Recovery Nail Strengthener - gotta keep those nails covered to minimize nail anomalies and irregularities.  There is also a gel polish called Recovery, by Gelish, that can help with covering and strengthening the natural nail.  However, a UV lamp and regular and proper removal of the gel polish is required.
  3. Cuticle Oil - to keep the cuticles smooth and the natural nails hydrated and flexible.  Of course, I recommend Bella10 CutiOil because of it's all natural blend that softens the cuticles and hydrates the nails.  When used regularly, CutiOil  will minimize breaking and peeling of the natural nails and help eliminate hangnails.
  Artificial Nail Recovery IS Possible!!!  If Mary can do it, so can you.  All it takes is Patience and a little Perseverance!  Take the challenge!  Your nails can be better than they were before artificial nails!

For more tips on natural nail care, check out

8 Tips on How to Grow Your Nails Faster & Stronger


Monday, August 27, 2012

How to Remove Acrylic Nails, Gel Nails, and Gel Polish

          I have heard an excessive amount of horror stories from ladies who go to certain nail salons for acrylic or gel nail repair or nail removal.   What makes these stories horrific is when I hear how they have had the artificial nail removed!  Ladies, it is UNACCEPTABLE, nor is it protocol, to rip off the acrylic or gel nail.  Fast… Yes.  Painful… Extremely!  Can they be removed easily and without pain?  Absolutely Yes!!!

          What type of nail do you have?  It is very easy to tell.  If a liquid is dipped into a powder then it is an Acrylic product.  If the product comes out of a pot or bottle already mixed and it is very clear and then each layer is cured under a gel lamp, then it is a Gel nail.  Some women are told that they have Gel nails when in fact they have Acrylic nails with a Gel overlay.  If a liquid and powder is mixed, placed on the nail, filed and then a clear product is placed on the nail and cured under a gel lamp, then you have an Acrylic nail with a Gel sealer.  So how are these types of nails supposed to be removed?
           Acrylic nails, with or without a Gel Sealer, are the easiest to remove without damage, provided you are not wearing MMA Acryilc Nails.  This technique can also be used to remove Gel polish and Shellac Polish in only 10 minutes.  For Acrylic or soak off Gel nails, just follow these simple steps:
1.       If the nail is very thick or you have a Gel Sealer on your nails, file down the thickness and/or gloss without filing into the natural nail.
2.       Place a piece of cotton, saturated in pure acetone, on your nail.
3.       Wrap the tip of your finger in aluminum foil, shiny side facing in toward your nail to hold in the heat of your finger.
4.       After approximately 10 – 15 minutes, remove the foil and cotton and GENTLY scrap off the acrylic product with a wooden manicure stick. For Gel polish and Shellac polish, you can just clean the nail with the remaining cotton to remove any additional residue.
5.       Repeat this process until the entire acrylic nail is removed.
          With Gel nails (unless it is a Soak Off Gel), it is a little more precise.  You must simply file it off, being careful not to file too much into the natural nail.  Start from a coarse nail file and work your way to a finer file, the closer you get to your natural nail.
          Once the nail is removed, you can replace the nail or lightly buff the nail and apply a nail strengthener of your choice.  Some of my favorite “after artificial nails” products are Jessica’s Restoration Base Coat and Salon Science’s Starting Over After Artificials.  Plus, there is a host of other great nail strengthening products such as OPI’s Nail Envy, Nailtrition, Nail Magic by Haken, American Classic’s Gelous Nail Gel Polish, CND’s Toughen Up, Essie’s Millionails, and many, many more, too many to mention.
       
          Again, it doesn’t matter if you remove the artificial nail at home or in the salon, it should not be painful. 

Remember… Pain equals more damage to the natural nail.
          Don’t put yourself through the torture of having your nails ripped off!  If you are in the nail salon, and if the technician is about to try to rip your acrylic or gel nail off, tell them NO.  Tell them you want them removed the safe way.  And if they won’t do it, get up and leave. Have your Acrylic or Gel nails removed the safe way only, and know your natural nails will be better for it.


You can recover from artificial nails!
Caring for your nails and skin is easy if you just take a little time and use good products on your skin and your hands.


If you want to learn what to do with your nails after you've removed your acrylic or gel, see the blog post  

"The Secret to Artificial Nail Recovery"

Saturday, July 28, 2012

Acrylic Nail and Gel Nail Removal… Should It Be Painful? NO, NO, NO, NO, NO… Oh and did I say “NO!”

Today I heard a story that really got my ire up!  What is worse is that some people think this is the way things are supposed to be. 


Let me back up.  My boyfriend’s daughter recently went to a nail salon near where she works and lives.  She believed she had gel but it turns out she had acrylic with a gel sealer (a common misconception).  When getting the fills got to be too much for her wallet, she decided to take them off.  This seems very reasonable.  What is unreasonable is what happened next!


It seems the technician “took some clippers, hacked into my nail and used a piece of plastic to pry them off.  When he tried taking a drill over the top of my newly destroyed paper thin nails, I screamed and ripped my hand away… I literally walked out of there in tears.”  The other upsetting part is that her friend, who was trying to console her, said “it’s pretty much protocol, that s*@# hurts”.  I won’t disagree that it really hurt.  What I disagree with is the “protocol” part.  I can’t believe that some women think this type of practice is a normal part of the nail care services!  In Non-Standard Salons but for concerned nail technicians, this is an atrocity!!!


Let me make this perfectly clear!  Nail care should NOT be painful!  Some salons and technicians do things with the intention of being fast and “efficient”.  Is it efficient to leave a battered, thin, weak, painful wreck of a nail?  NO!  If anyone tries this with you, get up and walk out!  They do not care for your welfare or well-being with this type of behavior.  This is not nail care, it is torture!  And some women pay for this!  To end this type of behavior, we need to get the word out! Do not go to this type of salon!  If you, a friend or family member experiences this type of behavior, tell all your family and friends what happened and where they did it!  People need to stop paying to be tortured or it will continue to get worse!  Let’s get the word out.

Stop the madness!!!  Nail care (manicures, pedicures, acrylic and gel nails) should NOT be painful!  If it is, walk out!!!

Saturday, June 16, 2012

Is It Dangerous? The Truth About UV Gel Polish and UV Gel Lamps


This is concerning UV gel manicures as they have been discussed a lot in the media as to  the level of safety, both in the chemical composition and in the use of a UV lamp to cure the gel polish.  There have been a few articles I've read but I find them full of holes and the informed consumer needs to be able to read between the lines.  It makes me wonder if all of the "research" was paid in part by the nail polish manufacturers that are loosing money due to the popularity of some of the Gel Polish brands.  It's not that some of the polish companies have a bad product, in fact, I'm certain that are many excellent products currently on the market, it's just that some of the reports that I read seem biased.  We'll let you decide for yourself...

Gel Polish Safety

One of the problems that are mentioned are that the gel polishes contain ingredients that are considered hazardous due to reproductive harm or cancer causing ingredients.  Some ingredients in the gel polish brands may be listed in California's Proposition 65 list (this lists the ingredients that may be considered hazardous), I'm certain that the manufacturers have kept the chemicals well below the limits listed.  For those of you who do not know about Proposition 65, it lists chemicals known to be carcinogens and reproductive toxicants.  The list shows numerous ingredients that can be found in almost any product, some of the most recent being tape measures, belts, art kits, footwear, etc, etc, etc.  (You get the idea.)  Any intelligent manufacturer of nail products would be diligent in making certain that any ingredient needed would remain below the recommended "parts per million" as designated by Proposition 65.   Why would they take the risk?  The manufacturers are not stupid enough to have chemicals that could prevent the sale of their product.  
                                           

UV Lamp Exposure

The second concern seems to be the UV exposure while curing the gel polish. The amount of exposure required to cure the gel polish with a UV gel lamp equates to approximately 20 minutes per month which would be much less than it would be to drive your car daily.  According to Nails Magizine ("UV Nail Lamps Are Safe, Say Industry Experts", Nov 2010);
  • "UV-B output for both UV nail lamps was less than what was found in natural sunlight...  the amount of UV-B to which client skin is exposed is equal to what they could expect from spending an extra 17 to 26 seconds in sunlight each day of the two weeks between nail salon appointments"
  • " UV-A exposure is much lower than suggested in the dermatologists’ report...Test results show that UV-A exposure for client skin is equivalent to spending an extra 1.5 to 2.7 minutes in sunlight each day between salon visits, depending on the type of UV nail lamp used."

For Those Still Concerned by Chemical Ingredients and UV Exposure

For those concerned about chemicals, remember this, everything is a chemical, water is a chemical.   Water is extremely good for the body but too much can kill a person, even drinking too much.  Everything in moderation.  As for the UV exposure, if you are concerned, there are gloves available that inhibit UV exposure to the hands while still leaving the fingertips exposed for curing the gel.  And for those concerned with both... just use regular polish, you can keep it on for up to 10 days with a little effort and knowledge on your part.  For those who don't know how, (and here is my own little marketing plug) get the book "The Secret to Beautiful Natural Nails" by Alicia Lyons. 

Saturday, June 9, 2012

Gel Polish – Long Wear Without the Hassle


I’m certain that most of you are unaware there is a trend in the beauty industry to have chip free, 14 day wear, nails have a mirror finish with zero dry time! You heard that right... It's Gel Polish!
Gelish Basix Starter Kit - Find it at Sally Beauty Supply
There are several types of gel polish on the market; Shellac by CND, Gelish by Harmony, Mani-Q by Young Nails, Geleration by Jessica, GelColor by OPI, Gel FX by Orly, LeChat Gel Nail Polish, IBD Just Gel Polish, NSI Polish Pro,  and more. All of them need a UV light to cure the polish. Some require you to "buff" (lightly file the top of the natural nail with a 220-400 grit file). One of my favorite brands is Shellac. Shellac does not require you to buff the nail at all and can be soaked off without filing the top of the natural nail. This minimizes the damage to the natural nail plate. But beware, there are some NSS (Non-Standard Salons) that, even when asked specifically for Shellac, they will give you another brand of Gel Polish. Shellac, like most brands, also requires it’s qualified technicians to use the Shellac brand Base Coat and Top Coat. Shellac comes off easy with a 10 minute soak.

But a word of warning to those that think that they can go longer than the two weeks of wear or those that pick at their polish! Gel polish is so strong that if you do not take it off when it starts to wear at the tips, it will make your nails peel! In some cases, it can be as damaging as artificial nails. But when done correctly, Gel Polish will maintain a strong nail with a chip free, mirror finish!

Shellac made the news in the New York Times in April of 2010 (http://www.nytimes.com/2010/04/22/fashion/22Skin.html).
To find a qualified nail technician who offers Shellac brand gel polish, go to
http://www.cnd.com/Locate/Find-A-Salon.aspx